Faux Industrial Black Grid Windows: How-to
When it came time to redesign this small living room in Johnson City, Tennessee, I knew I wanted to do everything I could to make the room feel much larger. One of the first things I did was makeover these old windows. They had so much potential with those muntins. I came up with the idea to make them feel as if they were industrial steal, salvaged from an old factory.
Read on to find out how I did it.
faux industrial black grid windows
This post contains affiliate links, which means I make a small commission at no extra cost to you. See my full disclosure here.
Inspiration
We have so many old mills that look like this in Johnson City. I love the black grid look!

black industrial windows Source
And I know the panes are something most people would want to replace, but I think they are so interesting cloudy like this.

old industrial windows source
I already had the wooden grid on my windows which was original to the house, so this part didn’t require any effort on my end. 🙌 You can add these fairly inexpensively if you don’t already have them. It’s a timeless way to add charm to an otherwise average window.
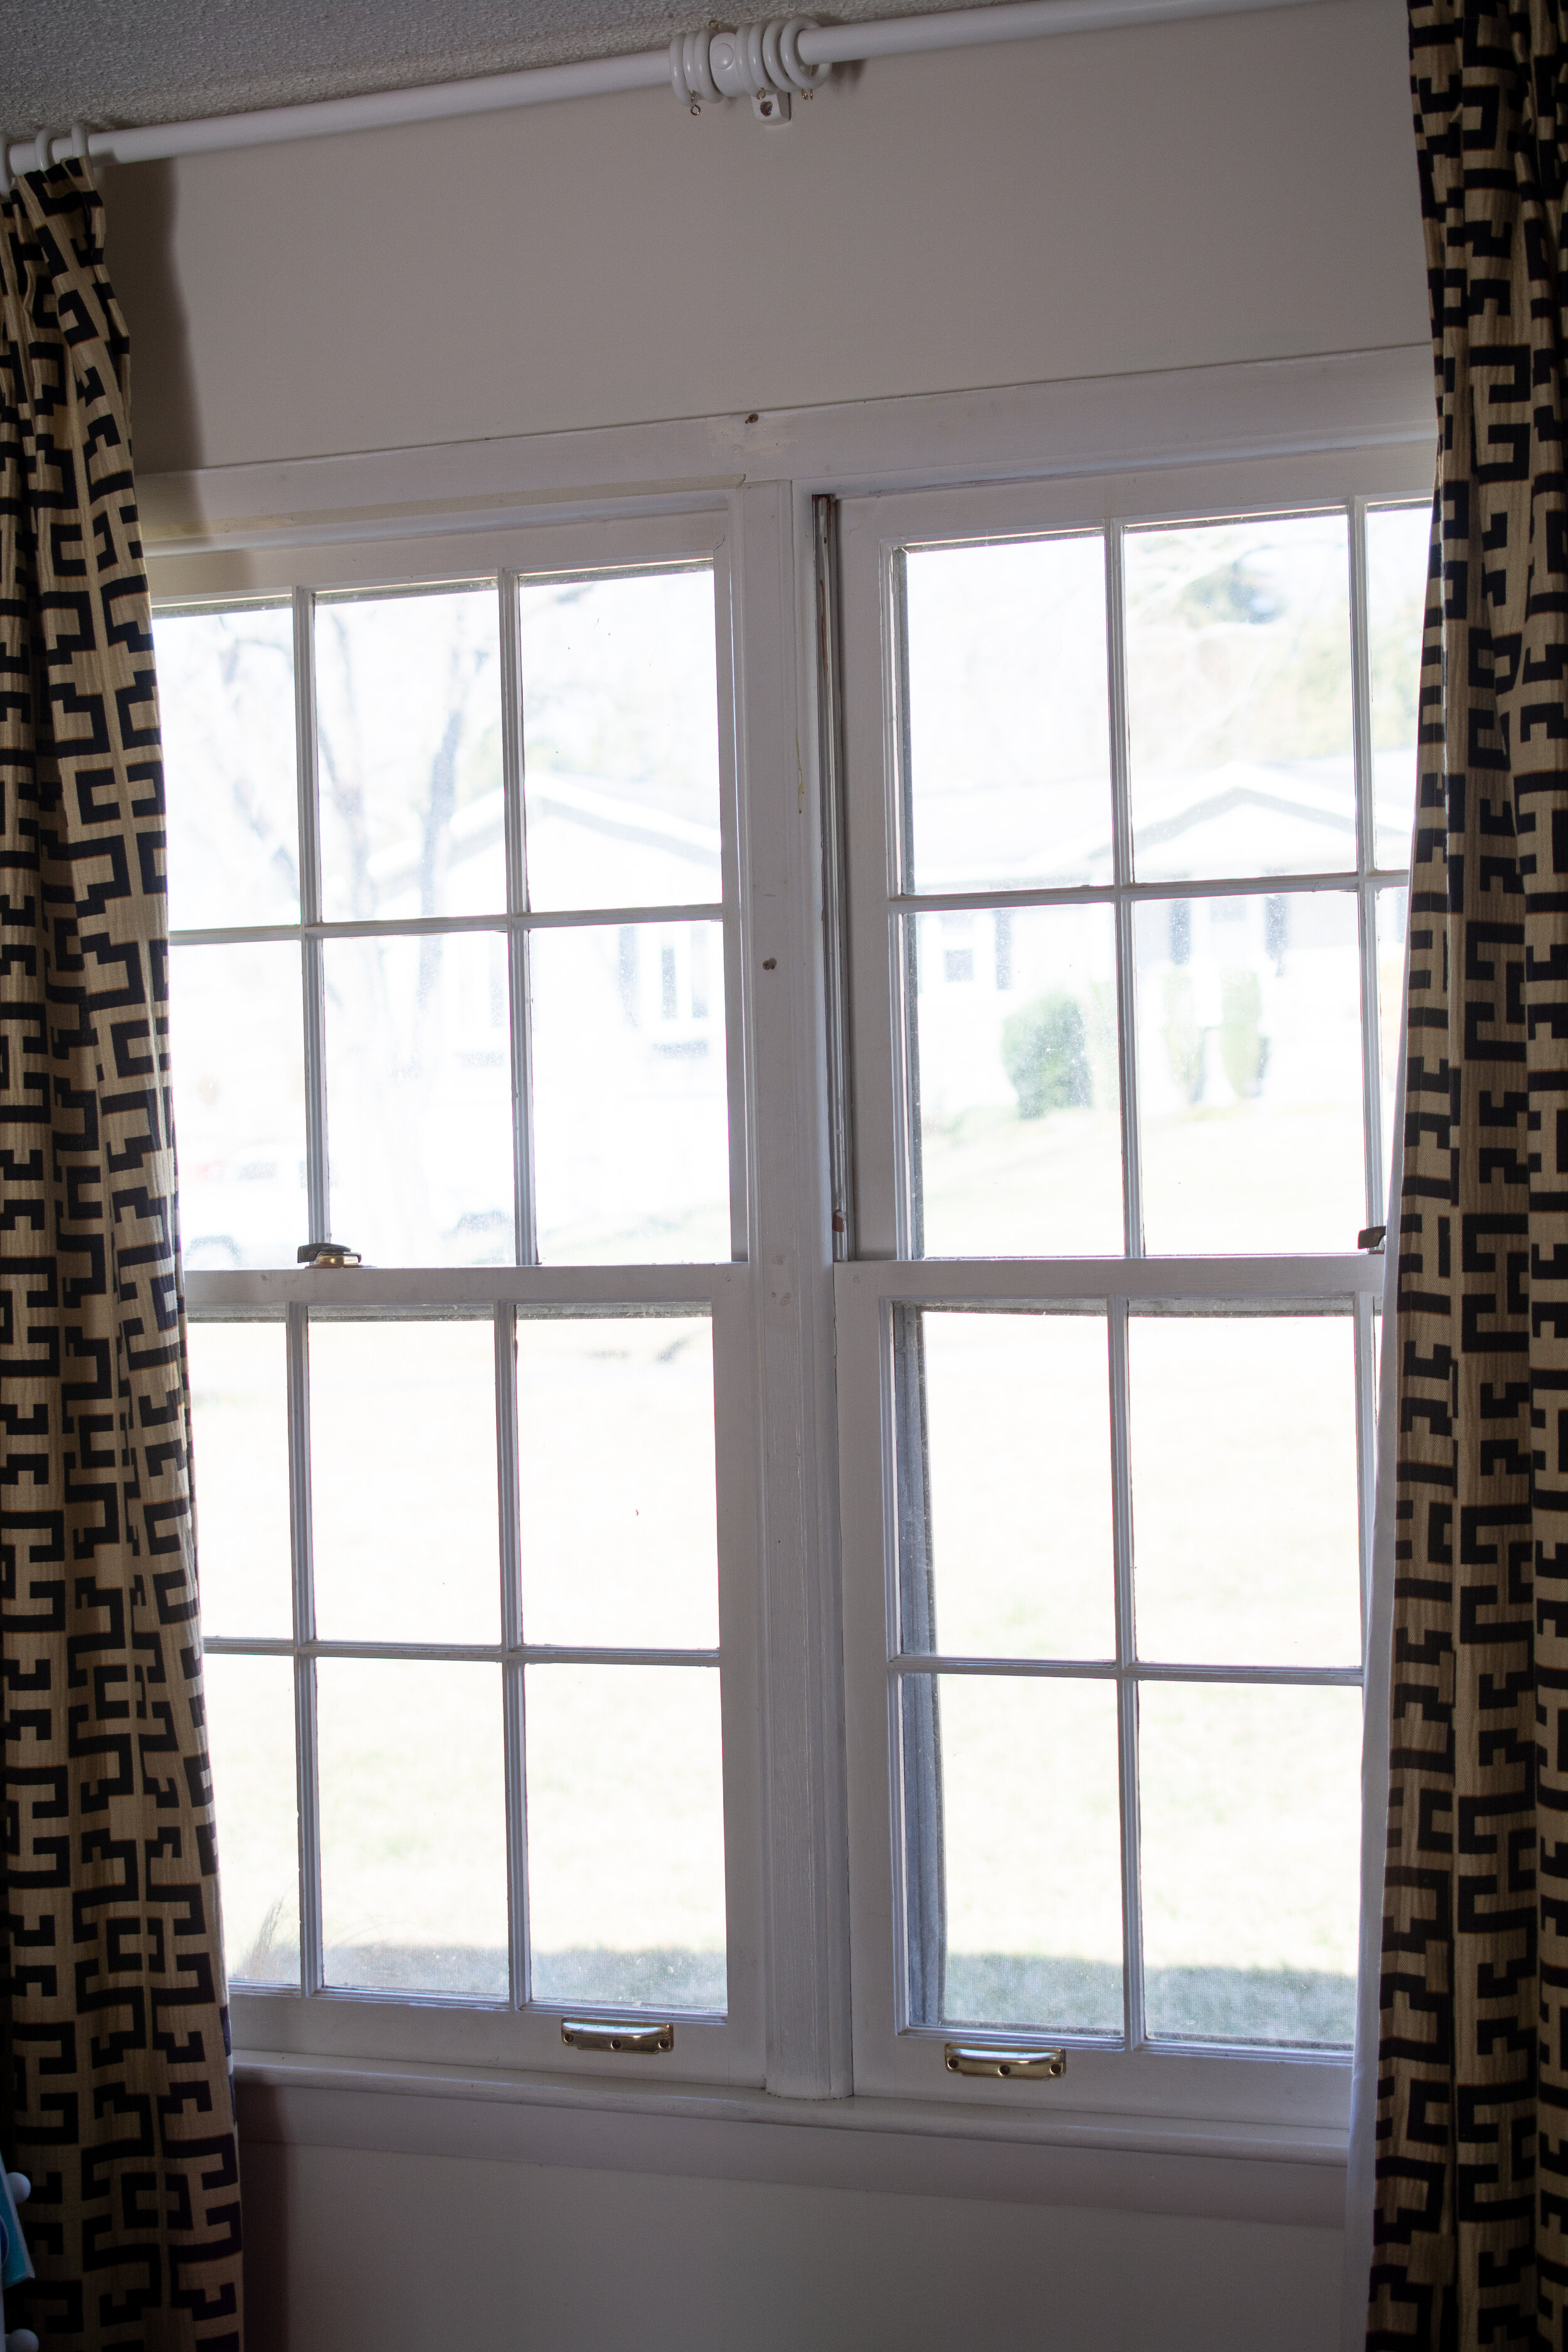
Before
faux industrial black grid windows
You can see how the drapes were just too heavy in this room before.

faux industrial black grid windows
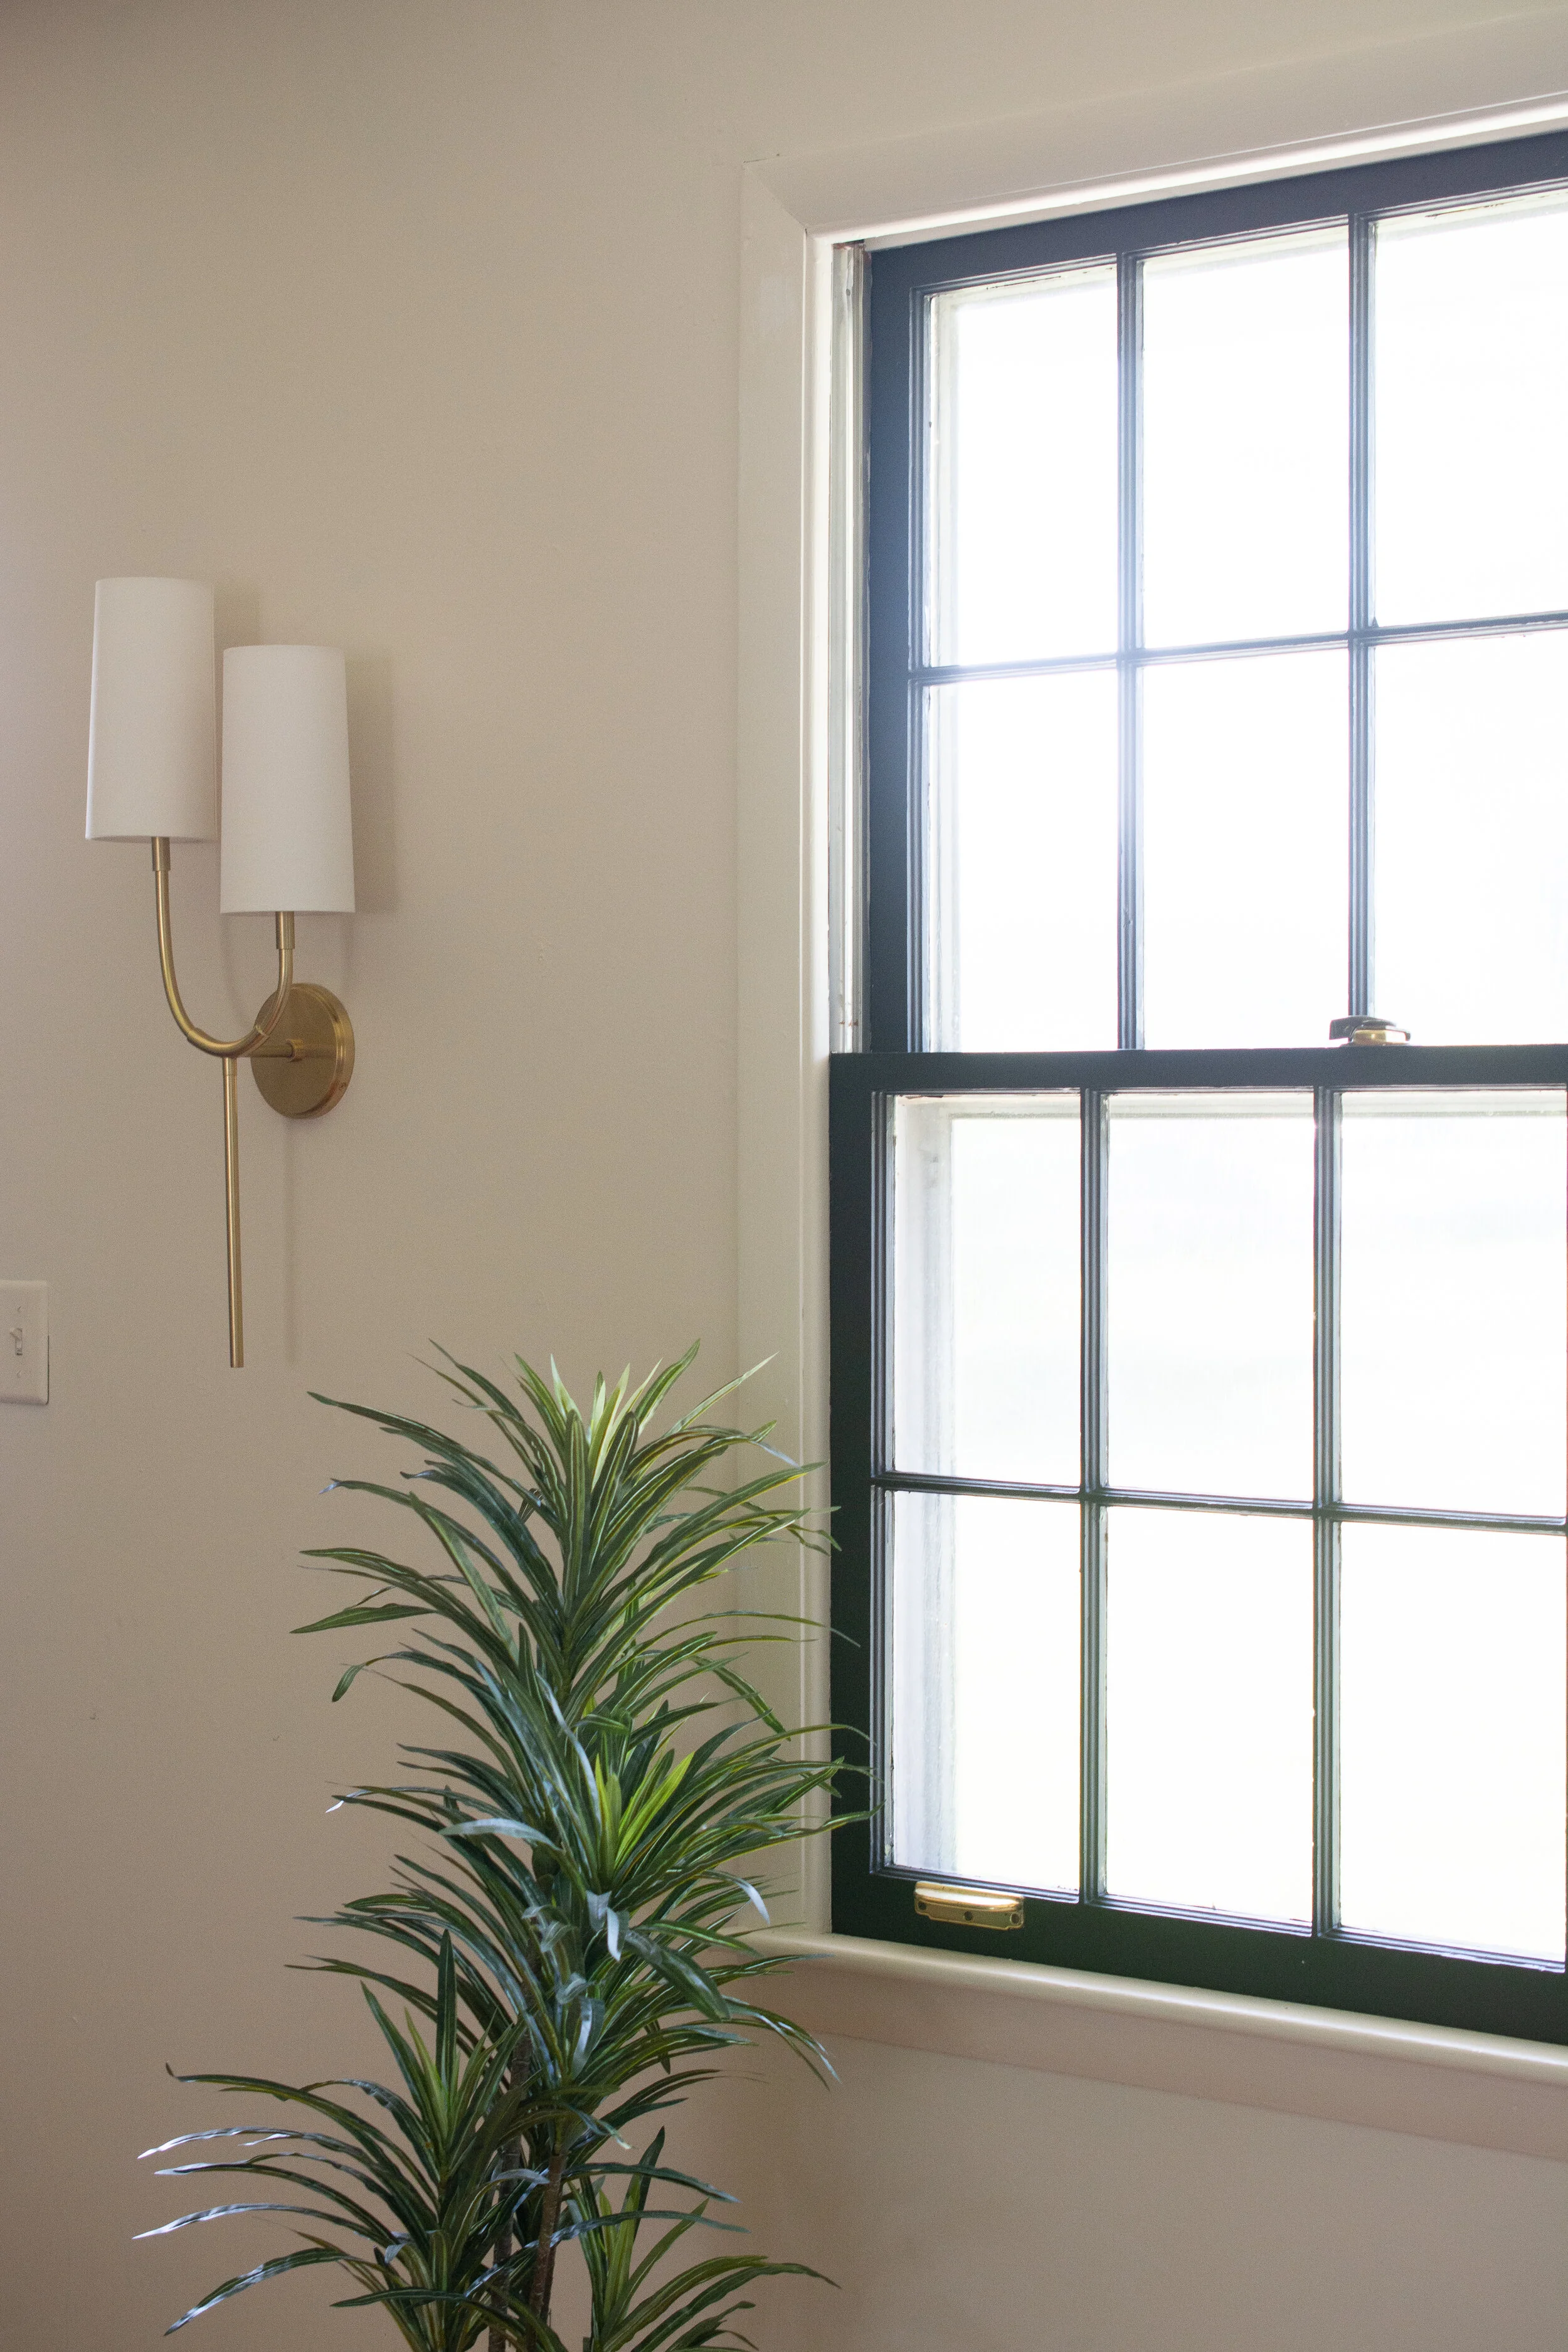
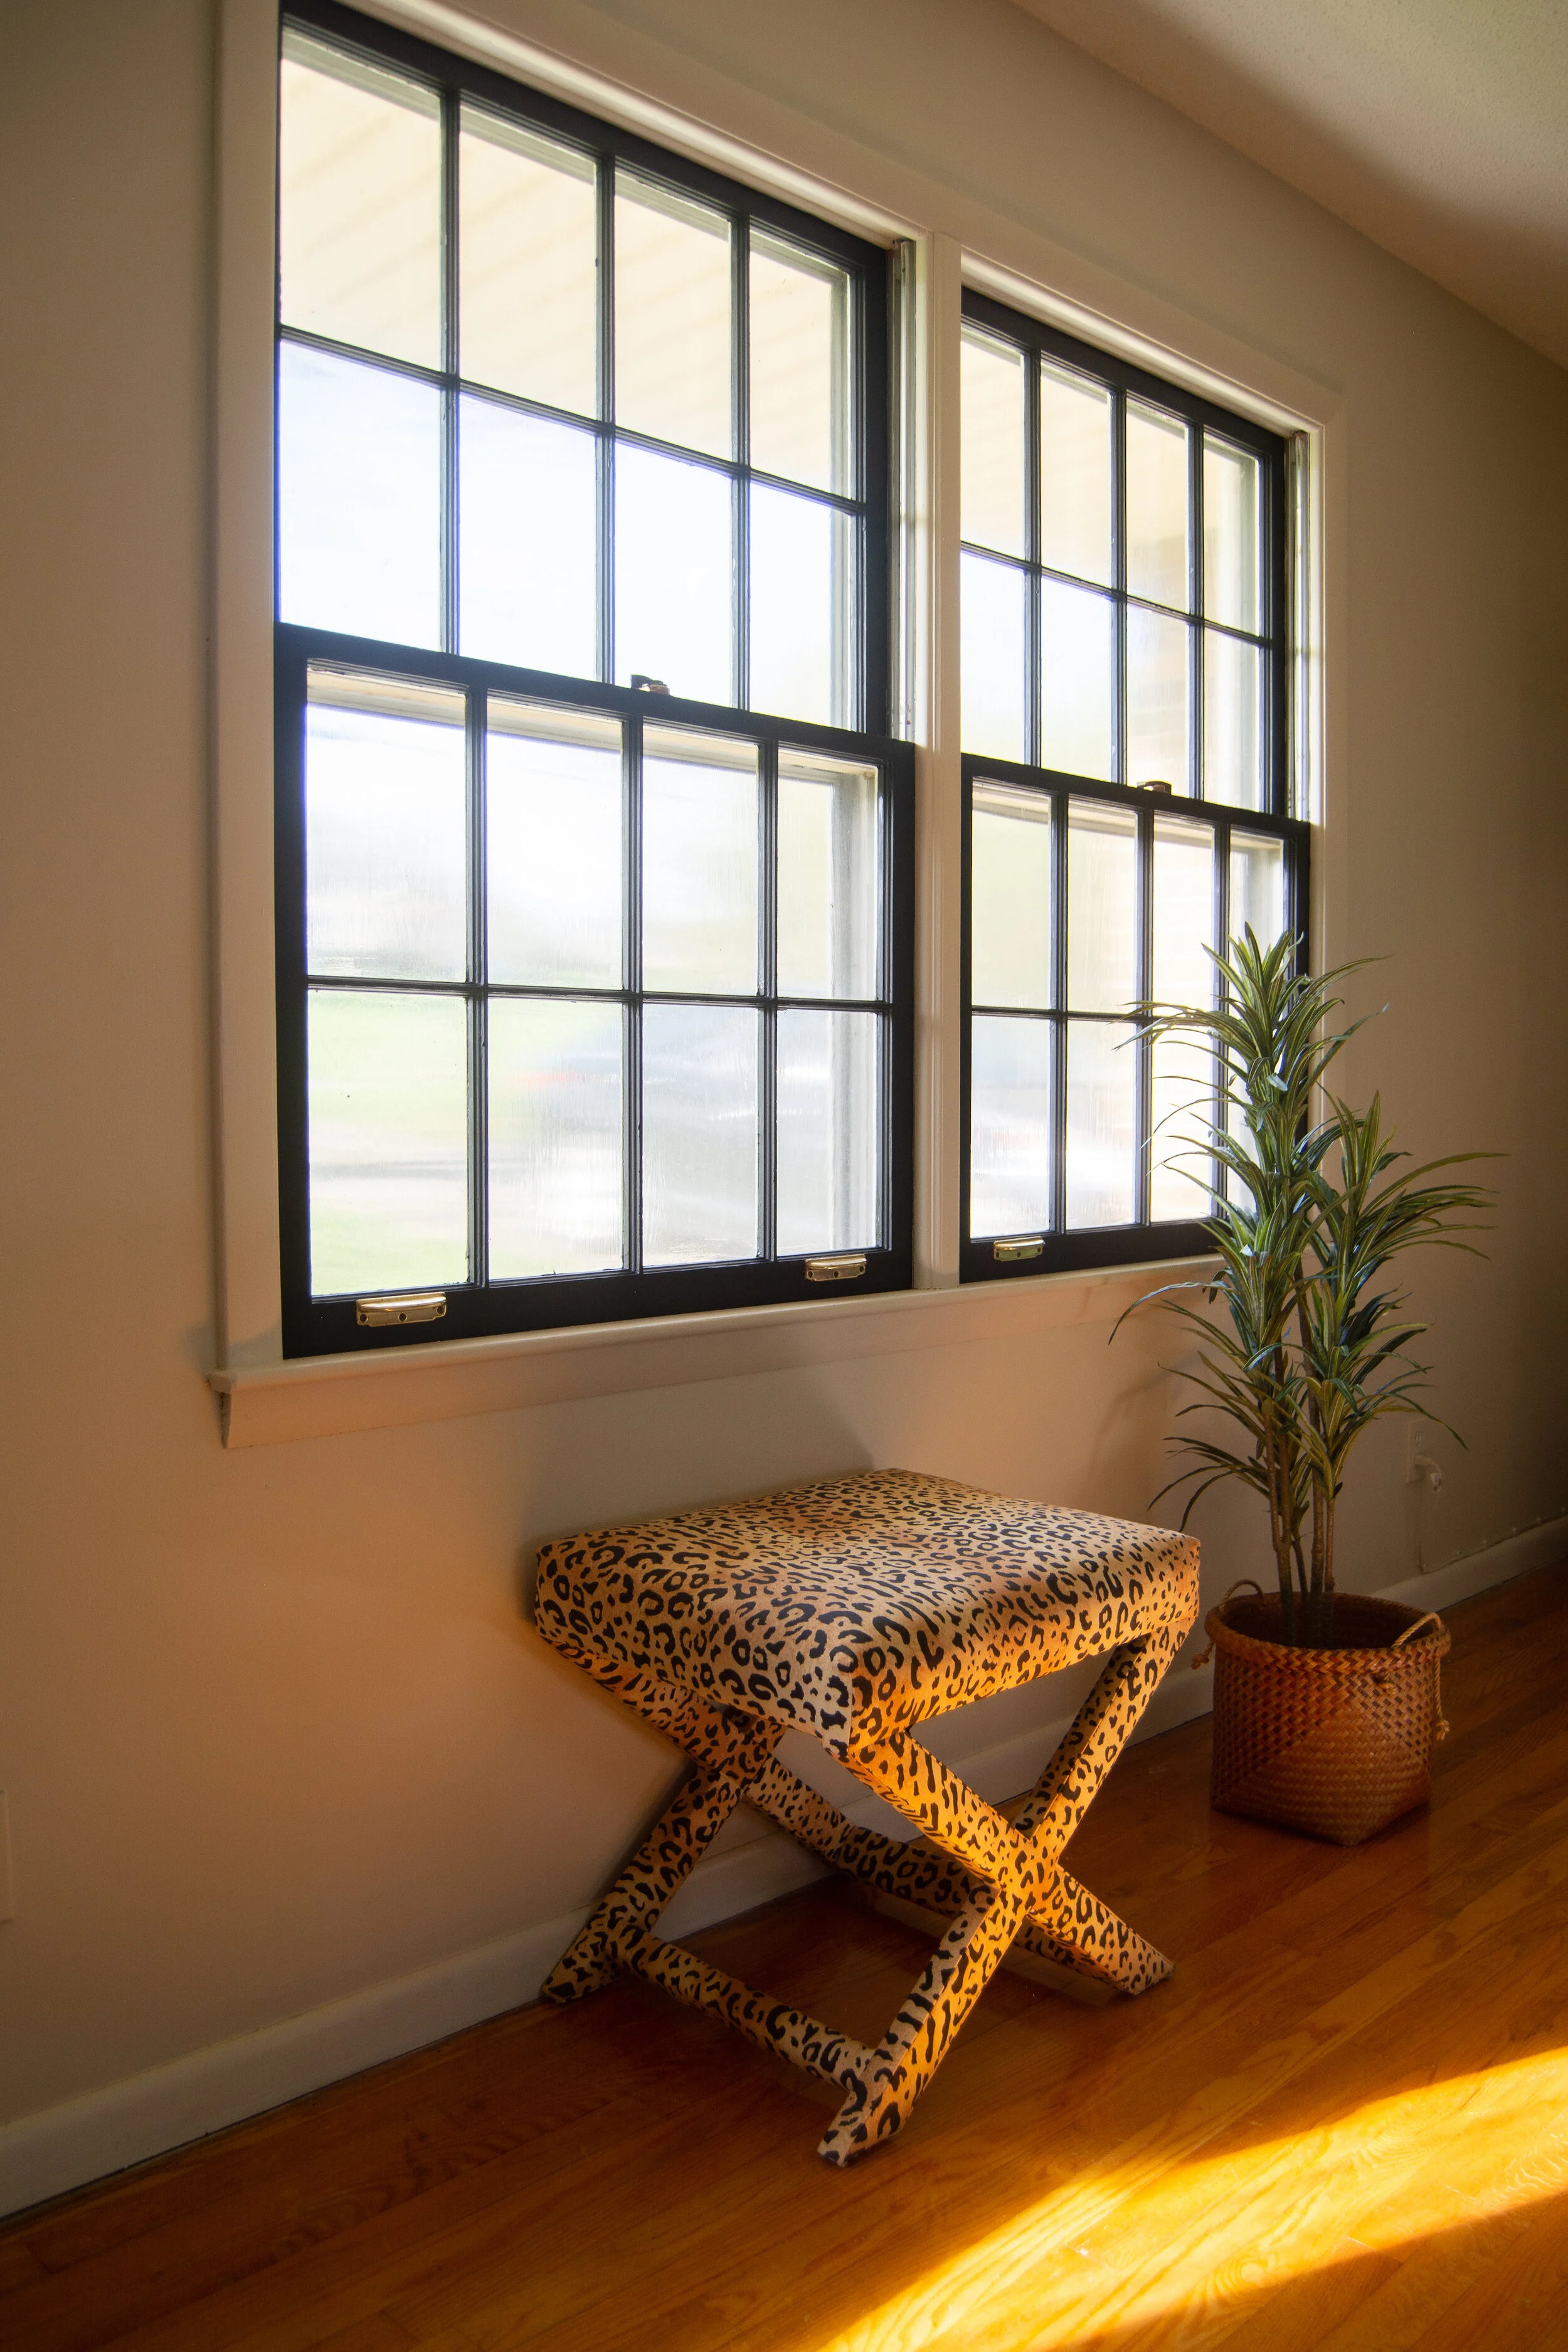
After
AHHH now that’s better.
By painting the trim surrounding the window the same as the wall color, it really made these windows feel inset, and more authentic.
how to paint window frames
Now that I could see the windows in all their glory, there was no way I was covering them up with ANY window treatment. Not. even. a. blind.
So my next task was to address privacy since this is a road-facing window. I stumbled upon this solution accidentally. And I can’t share with you how I did it without first explaining how I painted the windows. It was a total pane! (see what I did there?)

how to paint window frames
How to paint window frames
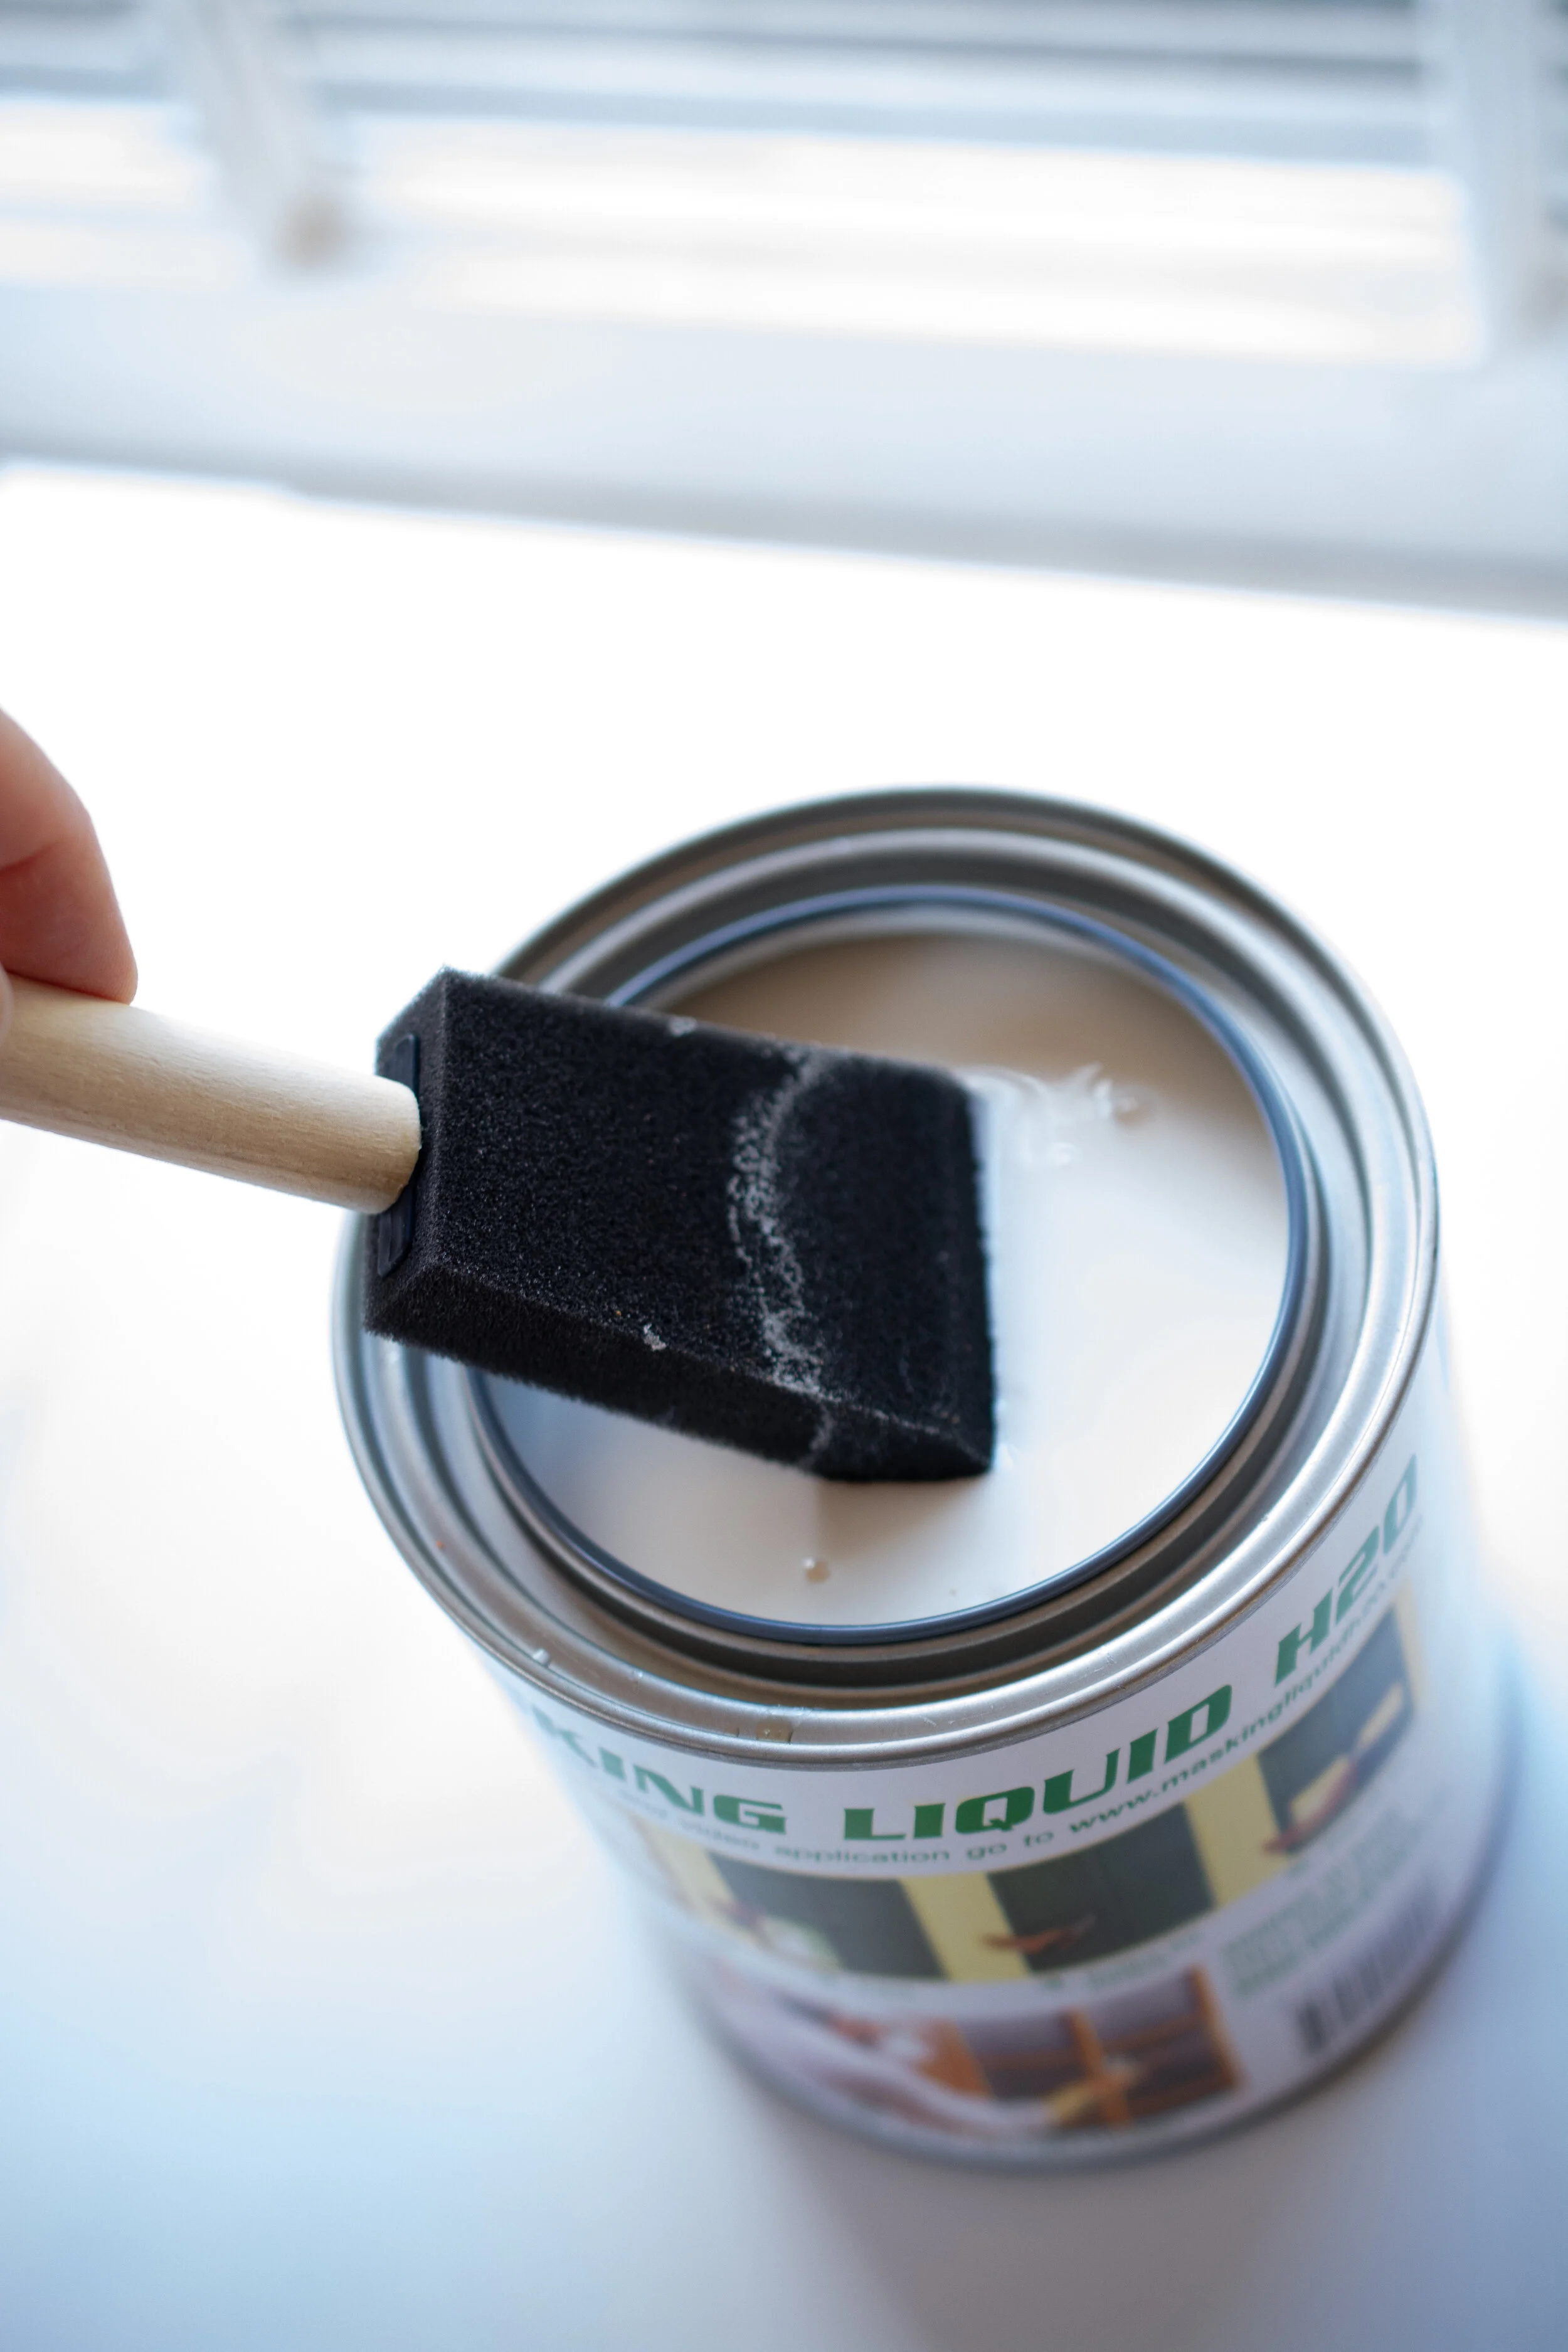
I used this product. It looks and feels so similar to modge podge if there are any crafters out there reading this. I would bet they are almost identical. But here it is, and this is what I used. I needed vary little of it to get the job done.
What is it? Masking Liquid H20. It’s a product you can paint over the glass of your windows that protects them from getting any paint on them during the painting process. Once dry, you simply peel off the masking liquid and voila! Much easier than going at them with a fine paint brush - I’ve done that too. Oi.

how to paint window frames
Step 1. Clear any heavy debris or dirt off the muntins (that’s the grid part of your window frames)

how to paint window muntins
Step 2. Clean the glass thoroughly with vinegar.

how to paint window muntins
Step 3: Now you are ready to apply your masking liquid to the glass part only. I used a wide sponge brush and I’ll explain why later..
how to paint window muntins

how to paint window muntins
Once it dries, it will start to look like this. This is where I realized, DANG this is pretty. It almost makes everything outside look like a Monet. It mimics the look of lead glass, or old factory windows, and that’s when I had my A-ha moment. This needs to stay! But first, back to painting…

how to paint window muntins
Step 4. Now you are ready to paint your muntins. I used Behr Marquee black interior paint in a flat finish so it looked like powder coated steel.
See the side on the left where I hadn’t removed the masking liquid? You can be as sloppy as you want with the paint here and it will all come off - trust me! Also, I used a large angled, paint brush but if you use a sprayer, this will go even faster. I didn’t do that because I didn’t want paint all over the living room; however if you doing this before furnishing or plan to paint the rest of your walls, I would definitely purchase a sprayer. I didn’t do any taping on the trim because I knew I would be painting this with the wall color later. I generally never use painters tape anyway because I find a good, stiff angled brush, and a steady hand is just easier.

how to paint window muntins
Step 5: Once it’s entirely clear, you can use an exacto-knife or box cutter to run along the edges. (I snapped this photo from a different room so the paint color is different, but at this point, your window muntins would be black)
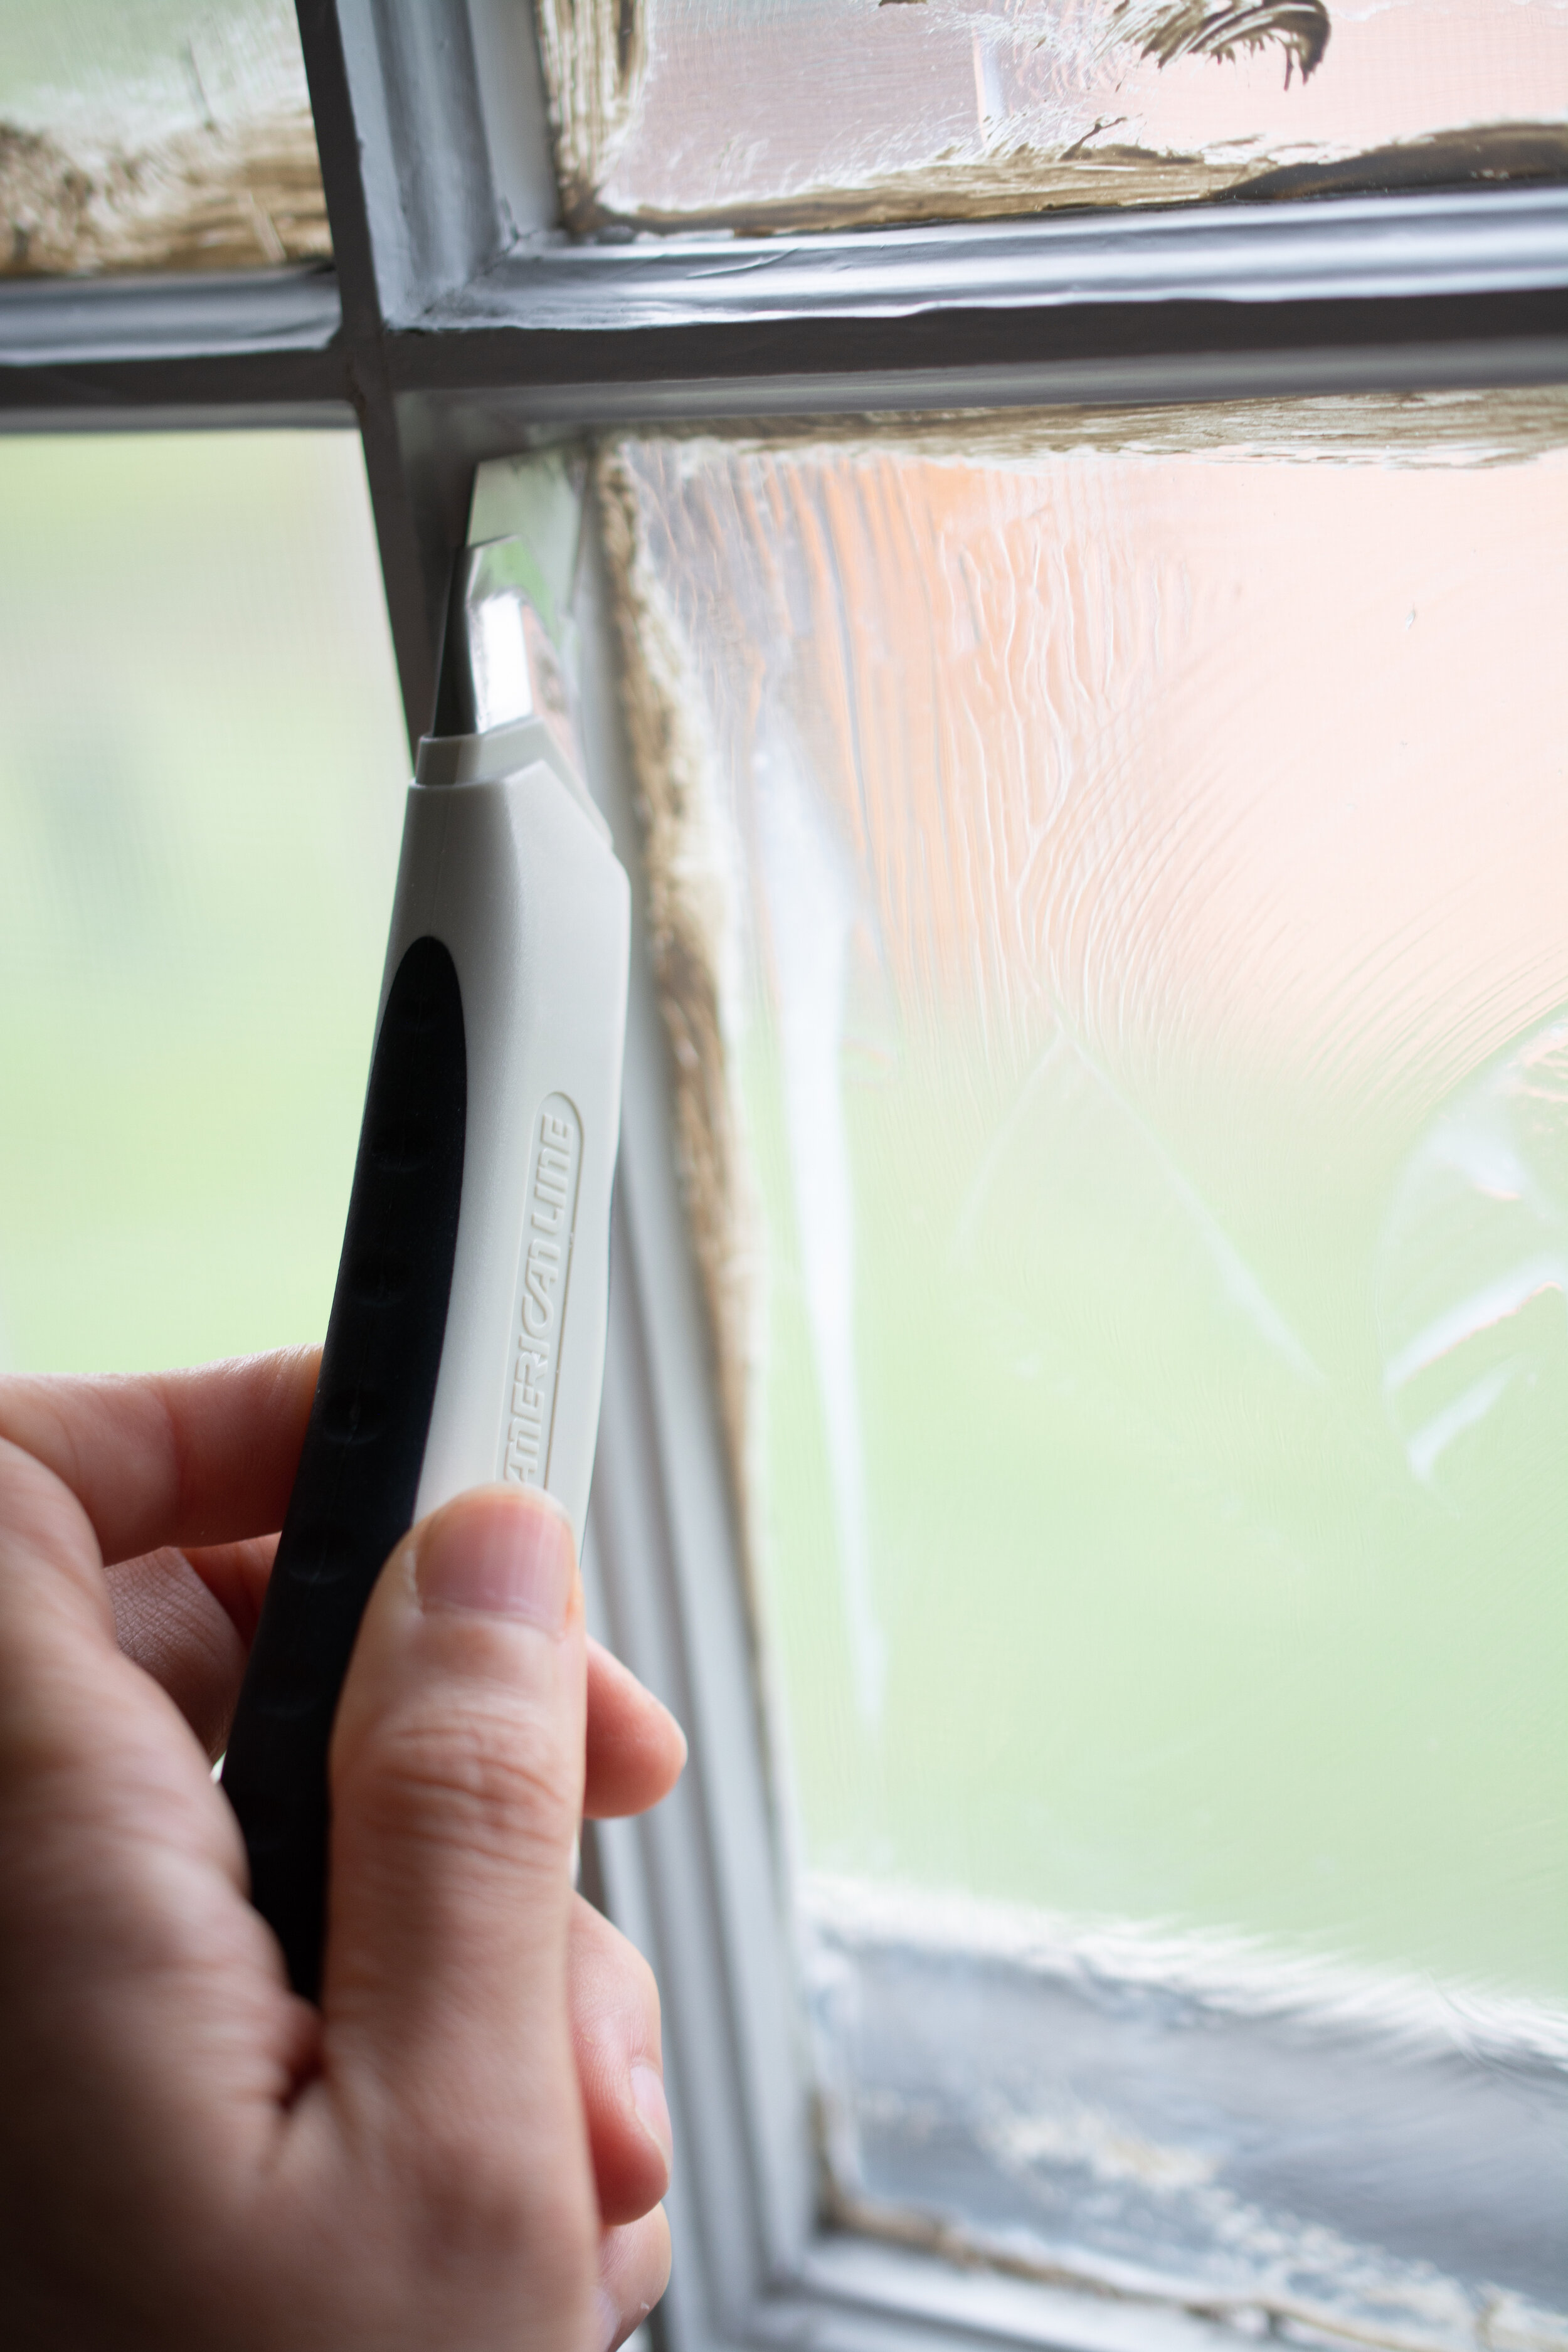
how to paint window muntins
Step 6: Now is the fun part - you can peel it right off! My 4 year old enjoyed helping me at this stage.
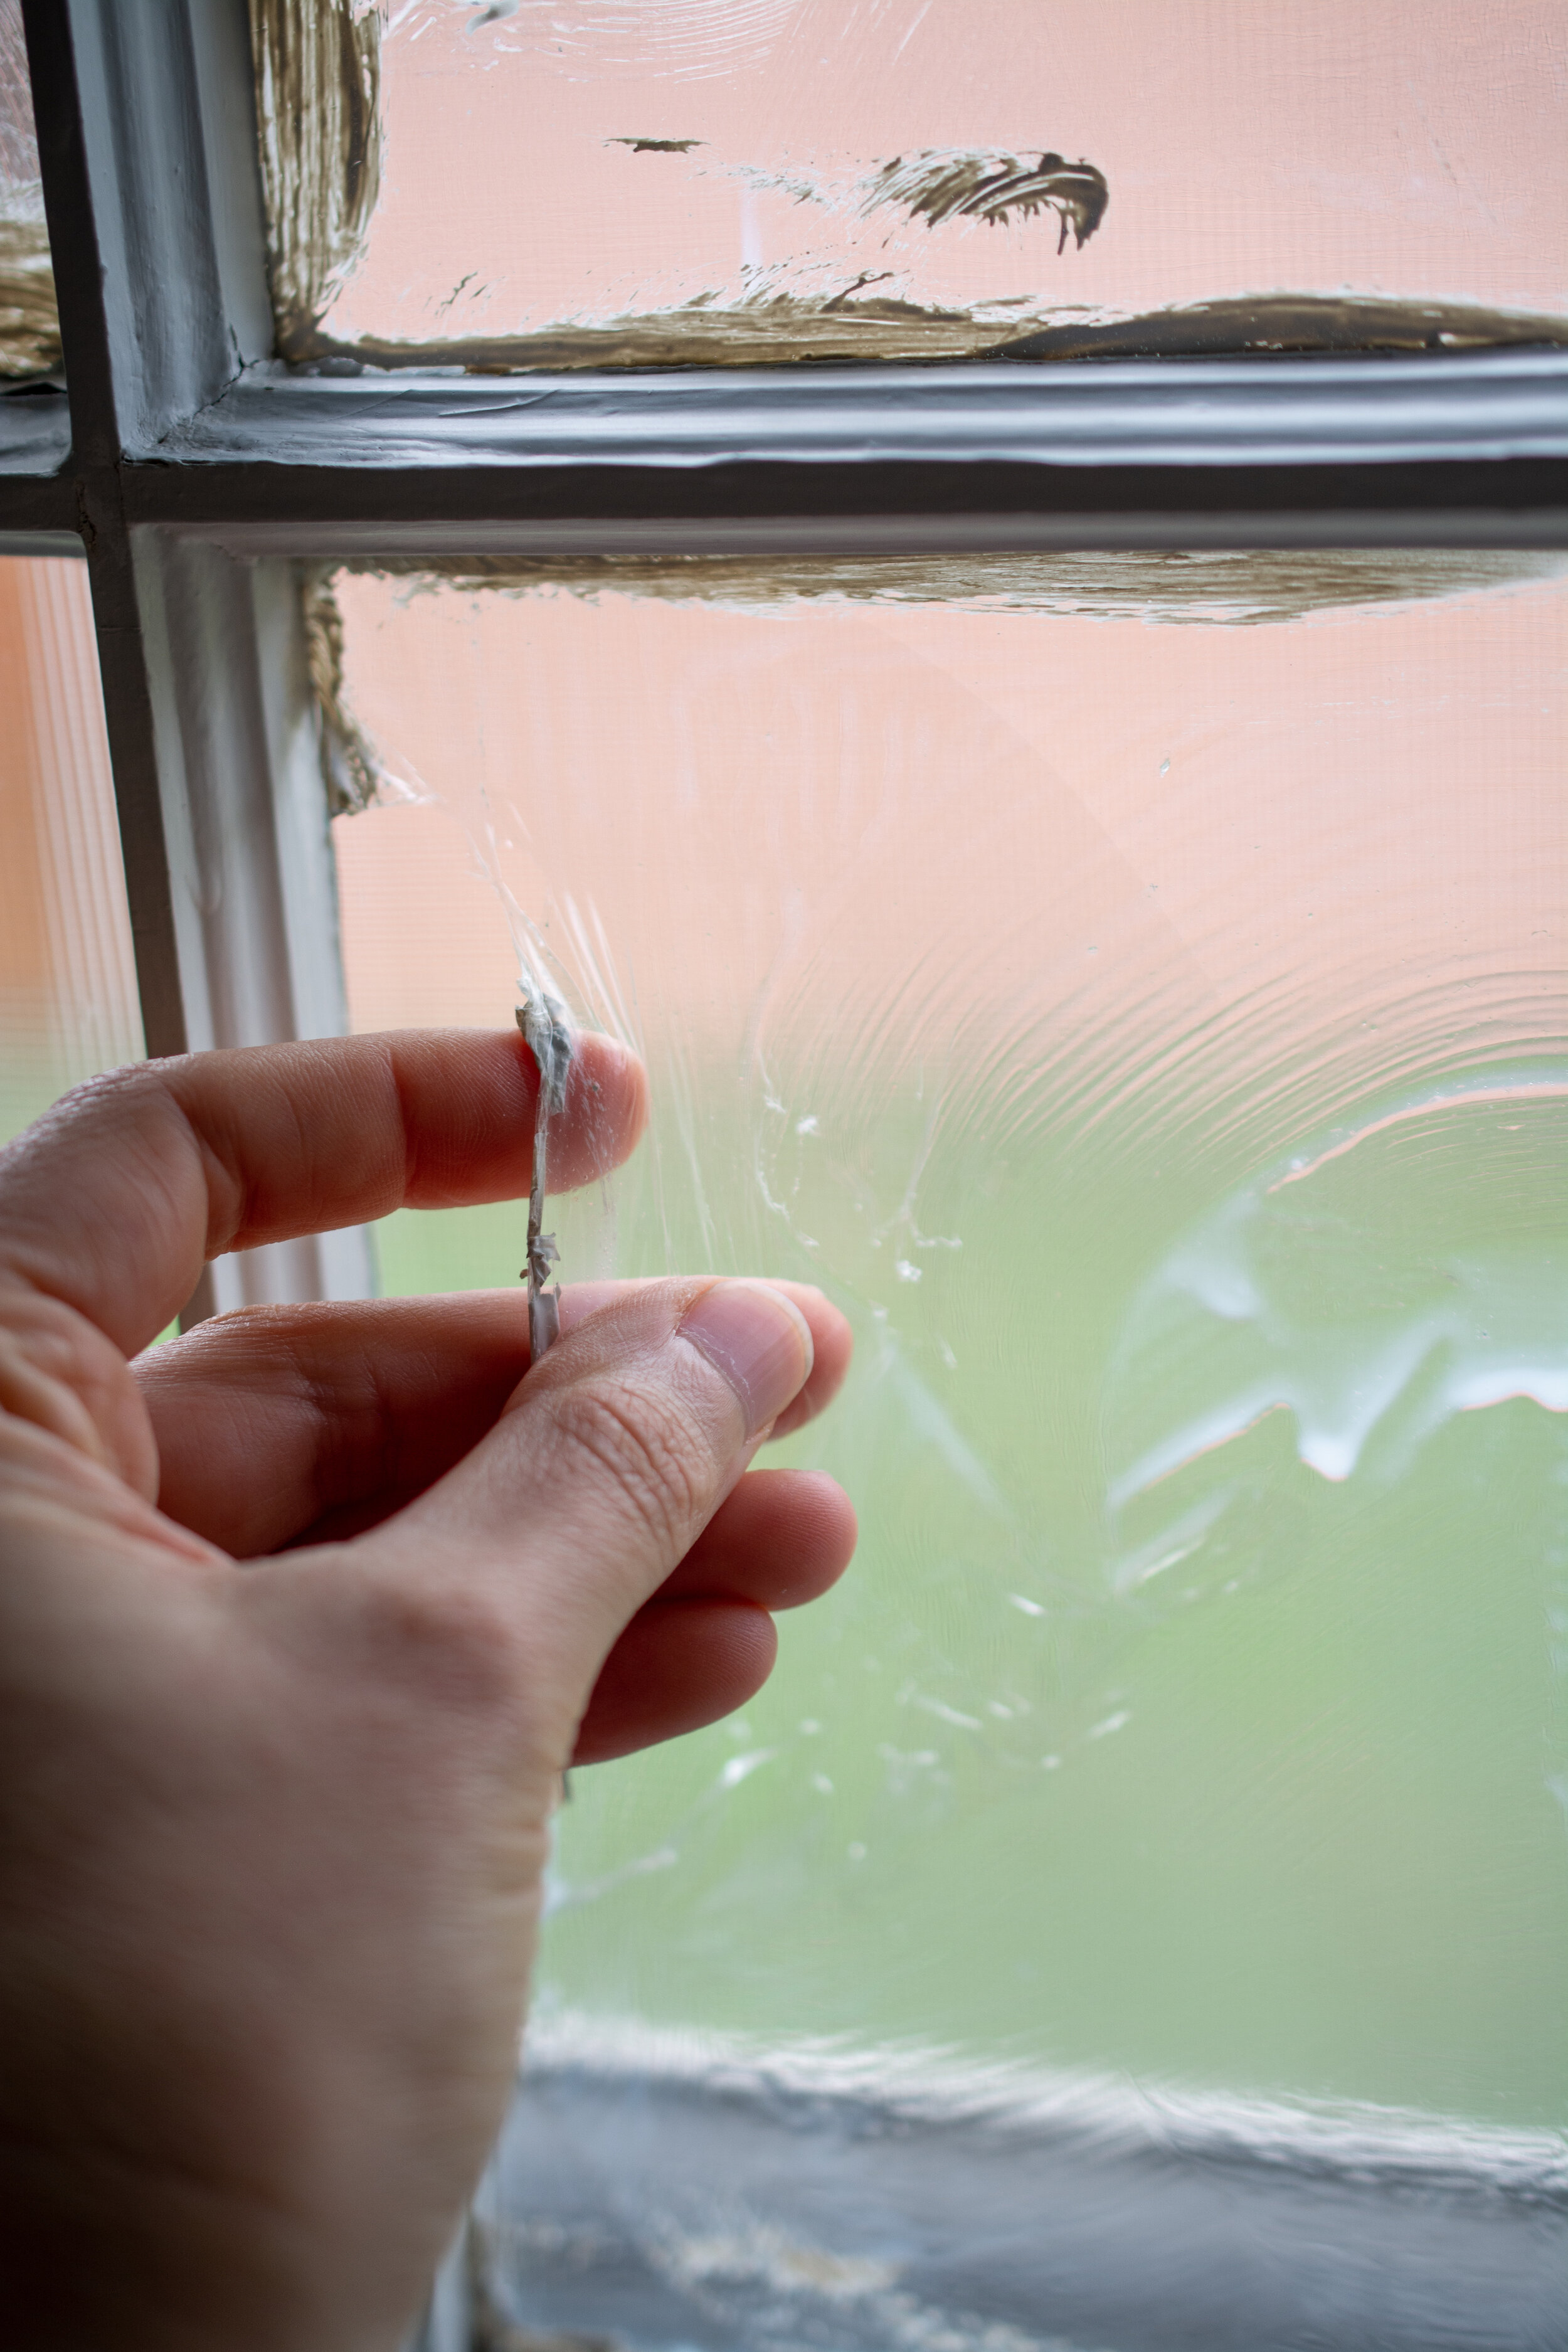
how to paint window muntins
At this point, if you want to see through your windows, you are done. However, if you want privacy and are okay with doing something a little unorthodox (maybe weird?), you can put the masking liquid right back on! Only this time, you are going to be very careful about how you do it. You don’t want brush strokes going in every direction like the photo from step 3. You want it to have those long, vertical streaks like you see in old glass.
Step 7. Use a wide sponge brush (bristles will add even more texture and will be harder to control) and make one continuous stroke from top to bottom without stopping. It takes some practice but you’ll get the hang of it. And it’s a real easy thing to do over if you don’t like how one of the panes turns out once dried.
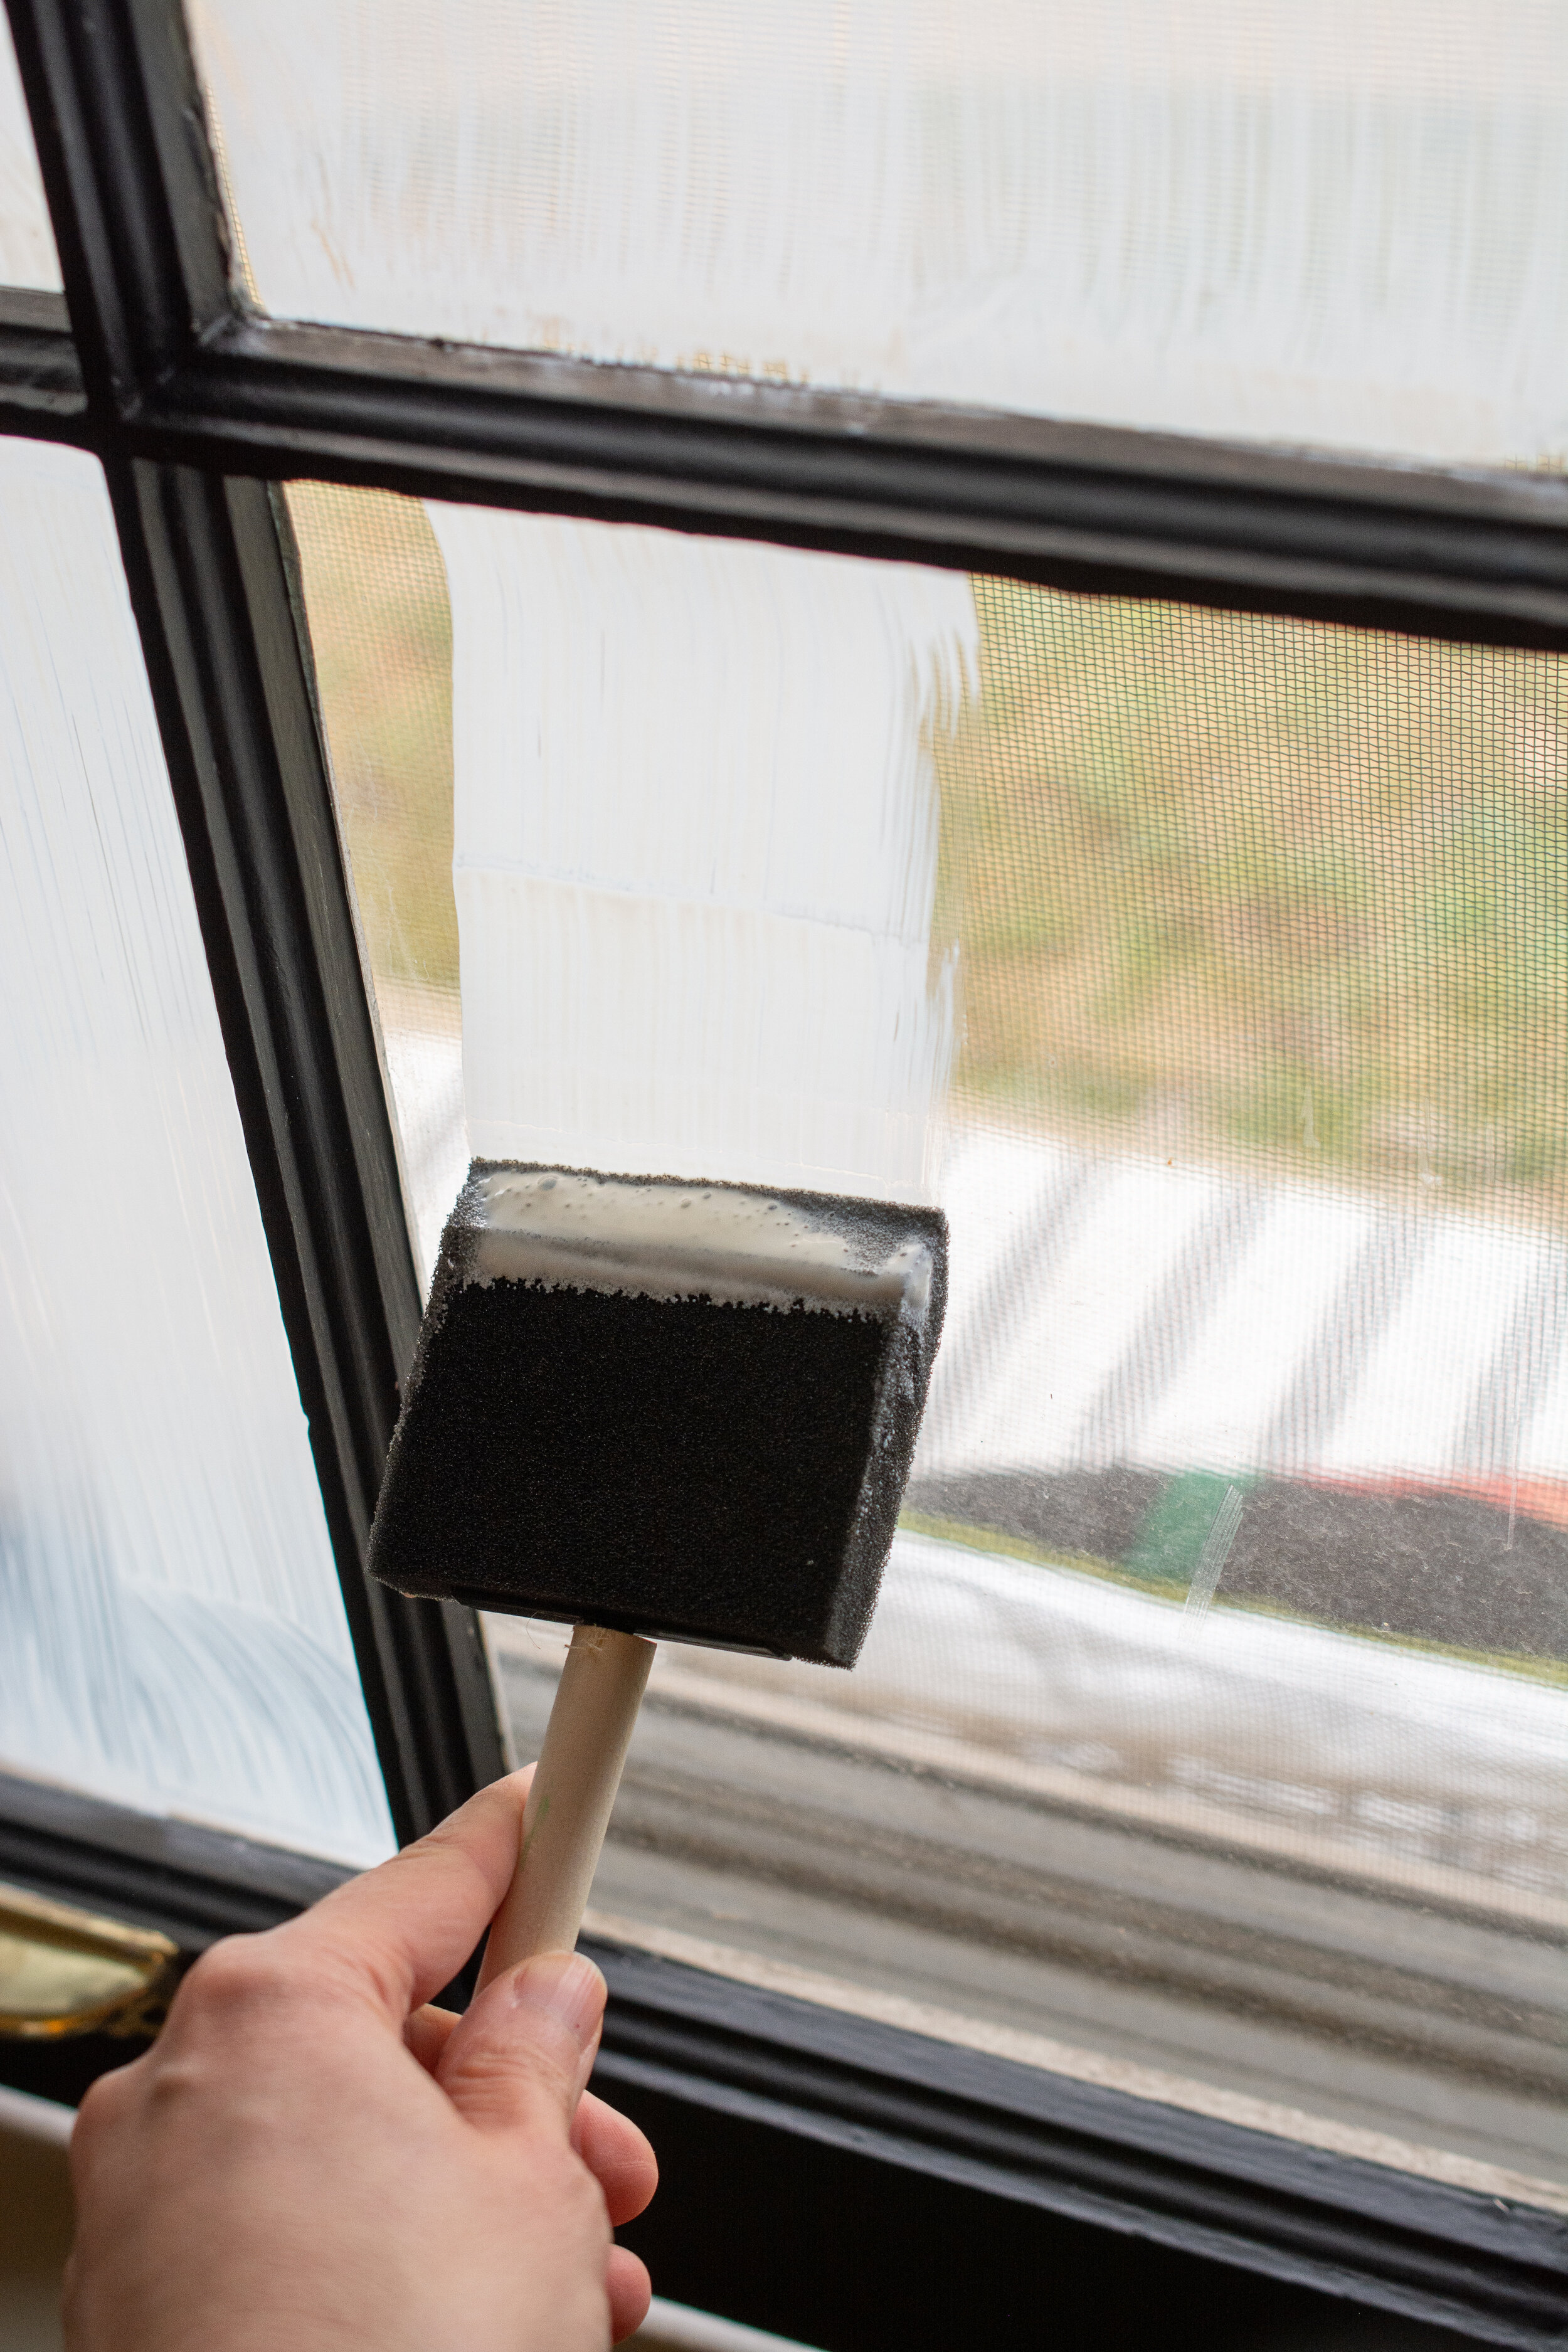
how to add privacy to windows
You are finished! Now you get all the light from outside, but can dance on your coffee table like no one is looking (if you are into that).

how to add privacy to windows
Because this product is water-based, it’s a non-toxic alternative to using vinyl window cling. And I think it looks more realistic as well.

how to add privacy to windows
No more drapes - now you can see more of the wall and it feels clean and modern.
This is just one of the things I did to make this room feel larger. I will share the rest later…
See more of this living room here

black windows in living room